Steve's Timeline Program
- Introduction
- Download
- Videos
- Documentation
- Timeline Files
- Tips
Features
- Builds timeline graphs.
- Each timeline graph is saved as a unique file.
- You control the graph's background, major grid & minor grid colors for each timeline.
- Allows you to add text, tables, & images to each timeline entry (which shows up in the Info window)
- The Add/Edit tool includes a RichText editor.
- You can control the Font/Size/Color of your text.
- You can even use Word to create your text info and load the RTF file into the RichText editor.
- All your text/images are saved in the timeline file.
- When the user hovers over a timeline entry, your text appears in a popup window
- When the user clicks on a timeline entry, a secondary window (Information window) appears allowing the user to view all of your text, tables, & images for that timeline entry.
- Each timeline graph has an About Note tied to it.
- This note allows you to tell the user:
+ What you hope the user learns from the Timeline.
+ See your documentation of where you got your information.
+ And whatever else that you want to relate to the user concerning that particular timeline. - You can export the graph to the clipboard for pasting into other windows programs.
- You can export: the graph, create tables, and your entries data to a Microsoft Word file.
[Logos Bible Software users: you can use these Word documents to create Personal Book(s).] - There are several short videos showing you how to use features of this program. (see the Videos tab)
Things you might use the Timeline program for
- Create your own timelines and document specific information with each timeline entry for your own studies.
- Export a timeline image and incorporate it in PowerPoint as part of your presentation for a Bible Study group or Sunday School class.
- Create handouts for a Bible study or Sunday School class, by exporting to Word and printing.
- Share timeline files with others in a Bible study or Sunday School class.
(Others can easily install the program on their home computers and you would send them the timeline file.)
This is a program that I am writing as a tool which allows me to construct timelines and associate specific information with each
timeline entry. I plan on using it to assist me in documenting different Bible study topics. If you are using this program, please email me
any problems that you run into while you are using it. This can assist me in tracking down bugs.
Contact: steve@clark-tx.net (the contact info is also shown in the About window from the Help menu)
Basics of the program
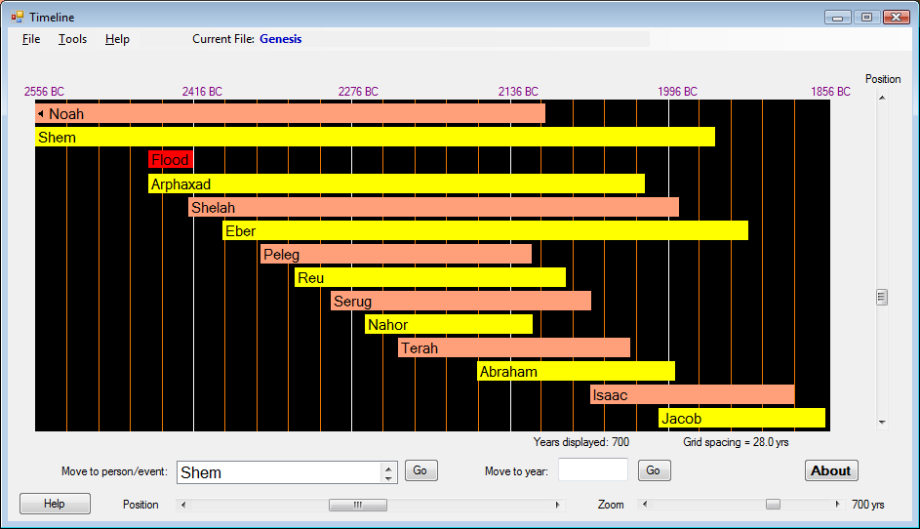
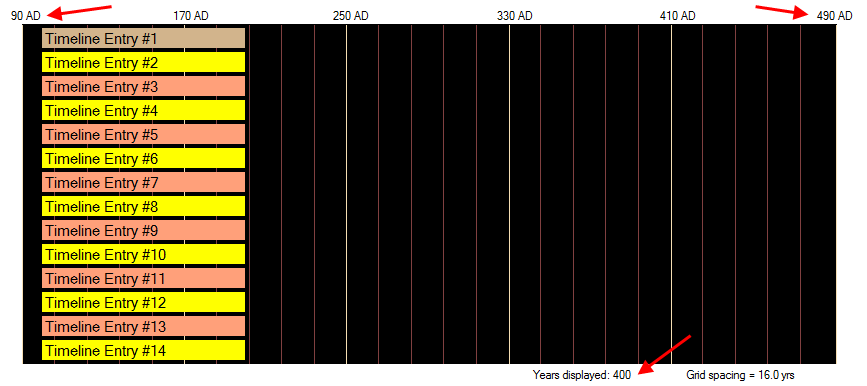
- Each timeline is saved as an individual file. In a timeline you will enter individual timeline entries (e.g. Peleg, Reu, Serug, etc). In the above image you see 14 timeline entries showing in the viewing area. You can enter as many timeline entries as you wish.
- The left edge of a timeline entry is aligned to the starting year that you entered for your timeline entry. The right edge is aligned to the ending year that you entered for that timeline entry. There are exclusion if you identified your timeline entry as an Event, in this case the left edge will align to the start year for your event, but the right edge is not necessarily aligned to a year. You have a lot of control over each timeline entry (Start year, End year, background color, etc)
-
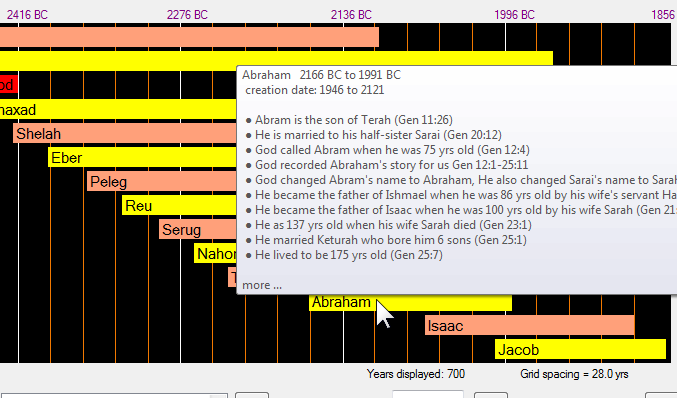
Popup window on hover (as shown in the above image)
When you hover your mouse over a timeline entry a popup window will appear displaying information that you have entered for your timeline entry. You can enter information for each timeline entry that you have added to your timeline. You will also signal how much of your information that you want to appear in the popup window (by inserting a line of 5 or more hyphens). -
Full Information window
If you click on a timeline entry, the program will open another window (secondary window) showing all the information and images that you entered for that timeline entry. This allows you to reposition the main window (graph window) and the Info window so that you can view them both at the same time. Clicking on any other timeline entry will repopulate the Info window with the appropriate info for that timeline entry. -
Viewing/Positioning Tools
When you start using the Timeline program you will quickly notice that you cannot change the size of the Timeline window. You cannot maximize it, nor change its width or height. This is done by design. The graph (viewing area) is set so that its image will fit width-wise on a letter size sheet of paper. This allows for clarity when viewing the graph image in a document; it also works well with PowerPoint. When you resize an image to fit on a printout the text will inevitably suffer in clarity, so no resizing is necessary. Also this fixed size works well across different monitor sizes in laptops (e.g. 14" and larger). So to simplify the program I used this fixed size. Another principal that I use, is to use multiple graph images when presenting timeline graphs to a user. You can see this concept in practice in a webpage that I built using images from this program (Genesis). There is an exception not mentioned yet and that is the height of an exported image. When using the Copy Screen to Clipboard export tool you can control the height of your exported image. It can be taller or shorter than the viewing area's height.
Learning to utilize the positioning tools will be an advantage when exporting your graph images to other mediums. Below you will see a brief list of positioning tools supplied with this program (also notice the highlighted areas in the image below the list):- Vertical/Horizontal sliders for positioning timeline entries within the viewing area.
- Zoom slider for scaling the time period shown in the viewing area.
- Move to Person/Event for aligning a specific timeline entry on the left edge of the viewing area.
[Note: this can also be achieved by right-clicking on an entry and clicking on Move to Person/Event] - Move to Year for aligning the viewing area to a specific year.

-
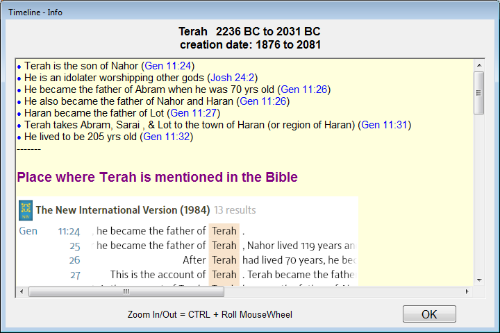
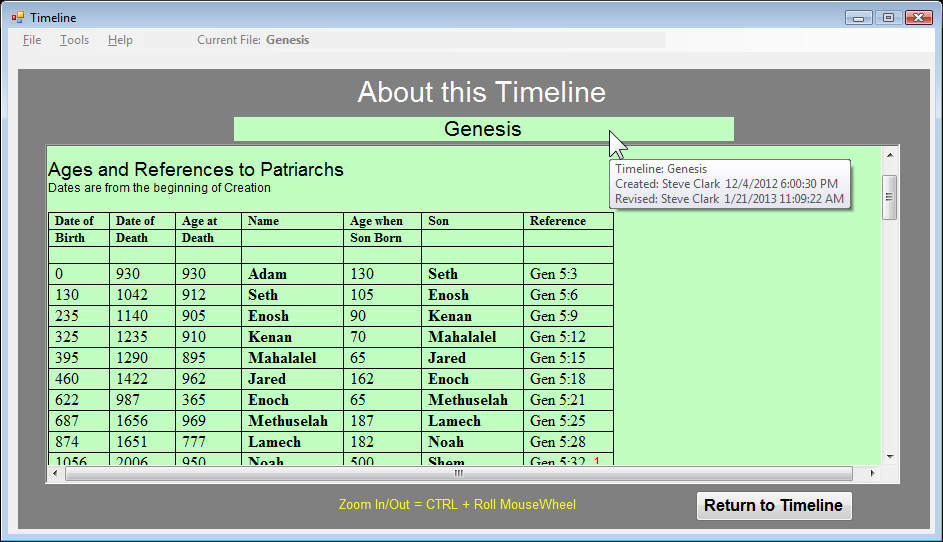
Timeline: About Note
In each timeline file you can add a specific note which I call the About Note. When the user clicks on the About button found under the viewing area, the above window is shown with your About Note displayed. This is intended to allow the user to see specific information the timeline author wanted to relate to them. This is a good place to inform the user what you hope they will learn from the overall timeline. This also is a good place to inform the user where you obtained information for your timeline. When the user hovers the mouse over the timeline title in this window (see where the mouse is in the above image), the user is shown the original timeline author and who revised it last. -
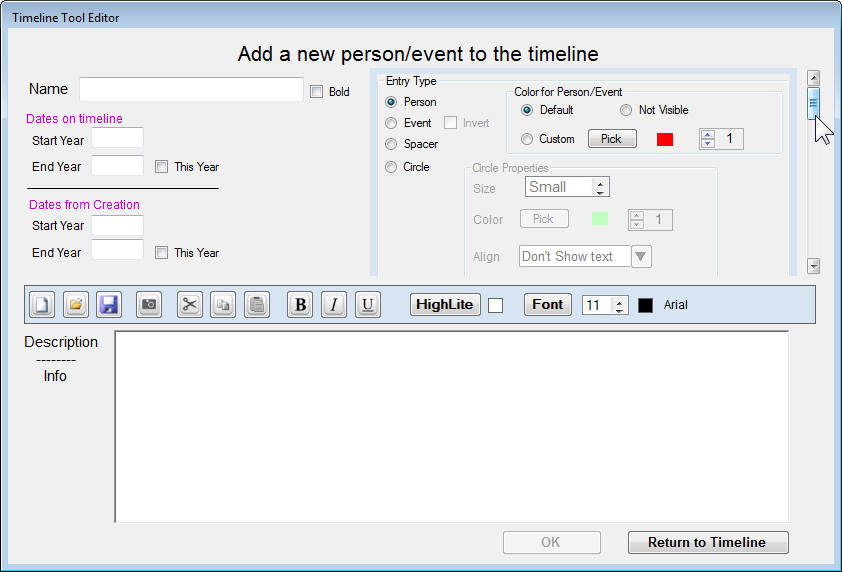
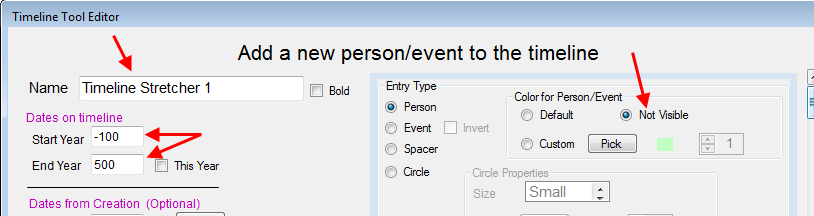
Adding/Editing Timeline entries
Under the Tools menu item you will find several tools for adding or controling your timeline entries. The primary tool (as shown below) allows you to create new timeline entries (Add Timeline Entry). It is in this tool window that you enter or edit a timeline entry's information. For more details on how to use this tool please watch the videos: Add/Edit tool (found under the Videos tab). -
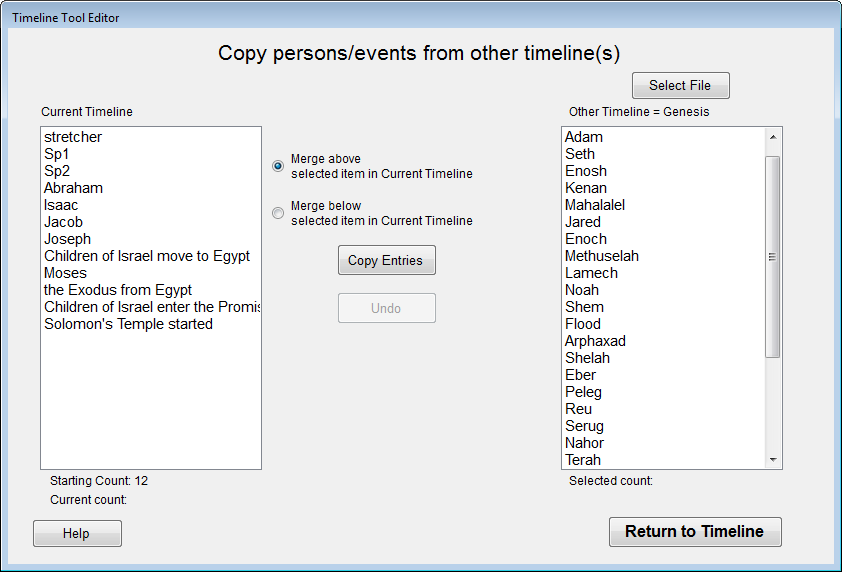
Copy from other Timeline
Under the Tools menu item you will find the Copy from other Timeline tool. This tool can save you a lot of time as well as keep your timeline entries consistent from timeline to timeline. This tool allows you to copy timeline entries from one timeline to another. When timeline entries are copied all their settings and information is copies as well. You also will be able to move more than one entry at a time and place them exactly where you want them in your current timeline. The way the tool operates also allows you to copy timeline entries from different timelines without having start it over again. -
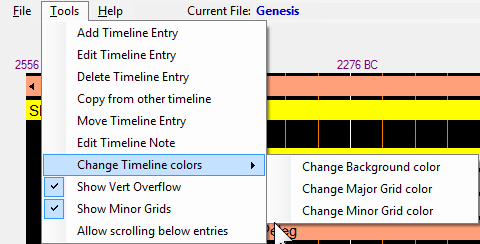
Other tools under the TOOLS menu
As shown above there are several other tools. These are coverted briefly in the Introduction video found on the Videos tab of this website. You can also read about them in the Documentation tab. -
Copy Screen to Clipboard
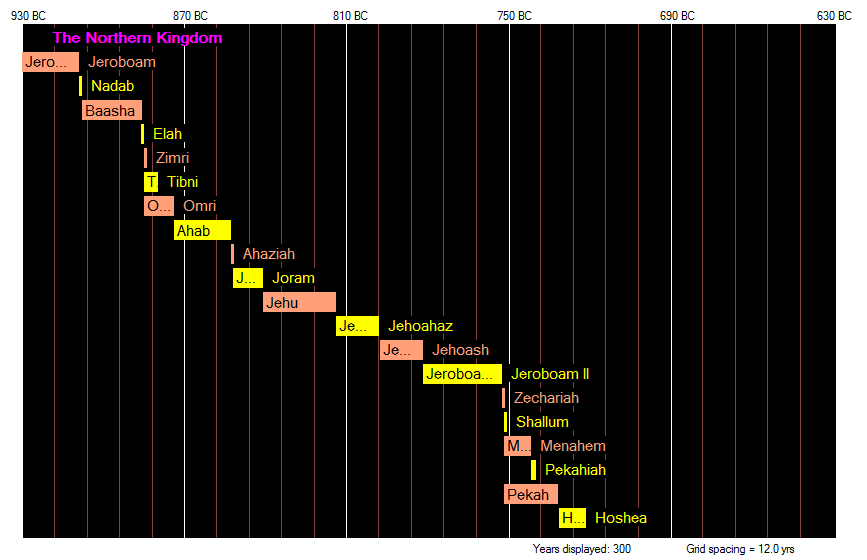
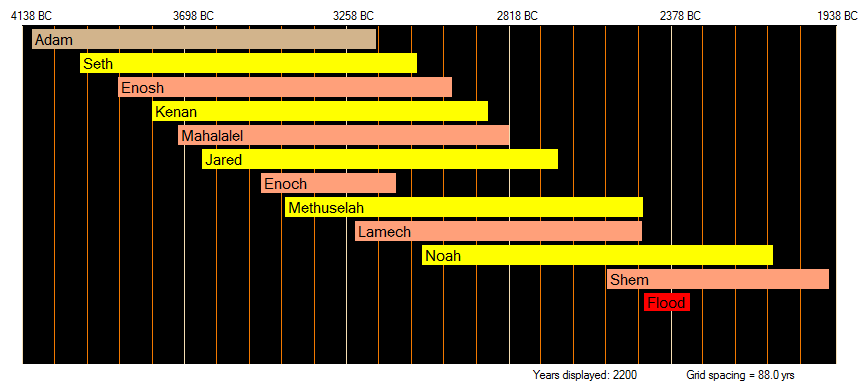
This export tool is found under the File menu item. You will probably use it often to export images of the timeline to other windows software (e.g. Word, PowerPoint, etc). It gives you control over temporarily altering the background color of the timeline graph. If you copying the image for printing out you probably don't want a solid black background. Under this tool section you will see checkable option call Copy Full Height. When checked it changes the way the timeline image is copied to the clipboard. It will copy whatever timeline entry that is showing at the top of the viewing area to the last entry below it in the timeline; this includes timeline entries which are not visible in the viewing area. You can also use it to create shorter height timeline images when used in conjuntion with the Allow scrolling below entries (found under the Tools menu). Below are a couple of examples.
Abraham - Joseph (shorter than viewing area)

Kings of the Northern kingdom (taller than viewing area)
Adam - Flood (normal size of the viewing area)
-
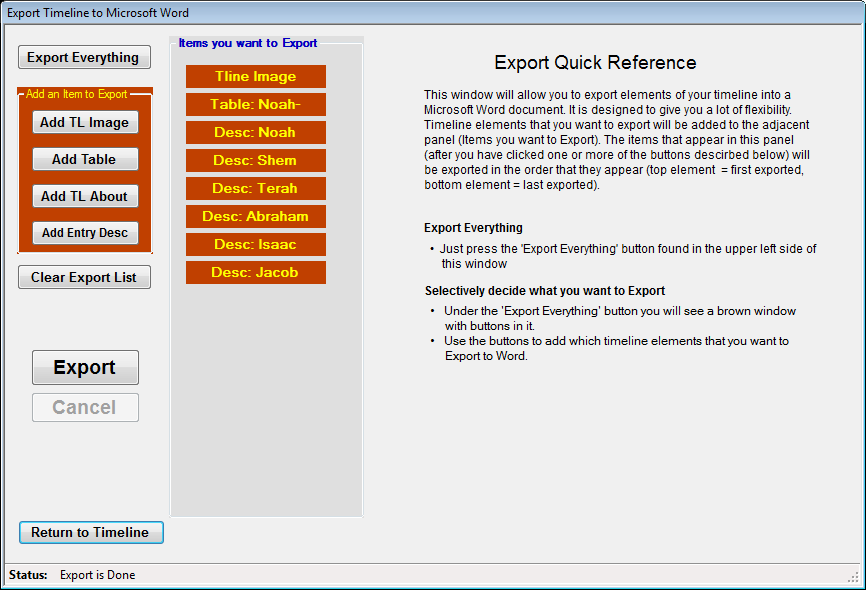
Export to Word
This export tool is also found in the File menu item. It allows you to custom export items in your timeline to Microsoft Word. This can come in handy when you want to generate a handout for those you are teaching.
The Export to Word tool window
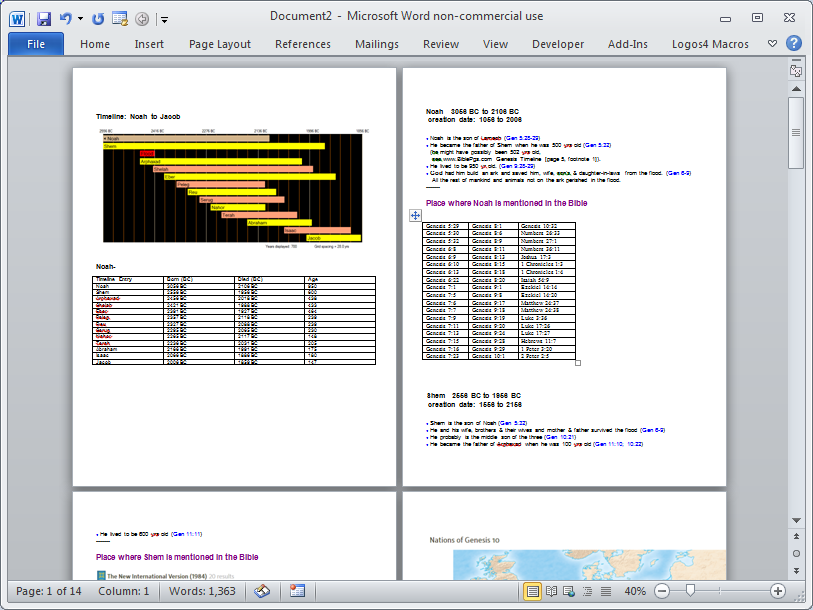
Sample of what was exported to Word (image is of the Word window)
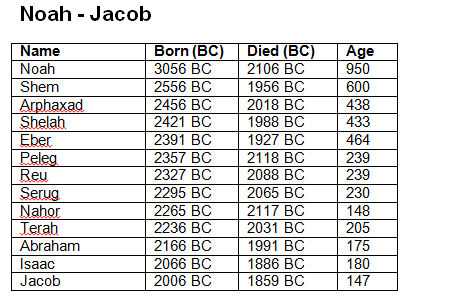
You can also create multiple custom tables using your dates and selectively pick which entries are include in the table. You select the column order and which columns that you want. You also specify the column's heading.
Website copyrighted (c) 2013 Steve Clark